---
uid: openxr-project-config
---
# Project configuration
Use the **XR Plug-in Management** settings to configure the OpenXR plug-in for your project.
To get started, follow the instructions in [Enable the OpenXR plug-in](#enable-openxr). This also installs the OpenXR package, if needed. Once installed and enabled, you can configure your project settings as described in the [OpenXR Project settings](#project-settings) section.
You can review the [Project validation](#project-validation) section of the **XR Plug-in Management** settings to discover if any setting values are incompatible with OpenXR.
## OpenXR Project settings
Some OpenXR features require specific Unity Project settings to function properly. The settings include:
* **[Enable the OpenXR XR plug-in](#enable-openxr)**: must be enabled to use OpenXR features.
* **[OpenXR features](#openxr-features)**: select the specific OpenXR features that you want to use.
* **[Render Mode](#render-mode)**: choose the rendering strategy.
* **[Color Submission Mode](#color-submission-mode)**: choose how color information is passed to the renderer.
* **[Depth Submission Mode](#depth-submission-mode)**: choose how depth information is passed to the renderer.
* **[Play Mode OpenXR Runtime](#openxr-runtime)** (Editor): choose which OpenXR plug-in to use when running in the Unity Editor Play mode.
* **[Interaction profiles](#interaction-profile)**: choose which OpenXR interaction profile to use for a platform.
* **[Color space](#color-space)**: When using the Open GL graphics API, you must set the **Color Space** to **Linear**.
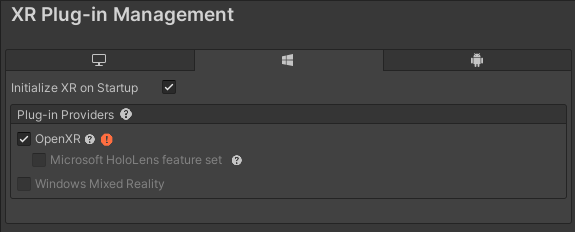
### Enable the OpenXR plug-in
To use OpenXR, you must enable the plug-in in your **XR Plug-in Management** settings. (Installing the package from the Package Manager does not automatically enable the plug-in.)
> [!NOTE]
> Enabling OpenXR also installs the package, if necessary. However, disabling OpenXR does not uninstall the package.
The **XR Plug-in Management** settings page displays a tab for each platform build target. Build support for a platform must be installed using the Unity Hub before you can enable an OpenXR plug-in for that platform. (Not every platform has a supported OpenXR plugin.) See the [Add modules](https://docs.unity3d.com/hub/manual/AddModules.html) section of the Unity Hub documentation for instructions.
To enable OpenXR:
1. Open the **Project Settings** window (menu: **Edit > Project Settings**).
2. Select **XR Plug-in Management** to view the plug-in management settings.
3. Select the tab for a platform build target to view the settings for that target.
4. Enable the **OpenXR** option in the **Plug-in Providers** list.

*Enabling OpenXR*
> [!TIP]
> If your project uses OpenXR on more than one platform build target, you must enable the OpenXR plugin for each platform.
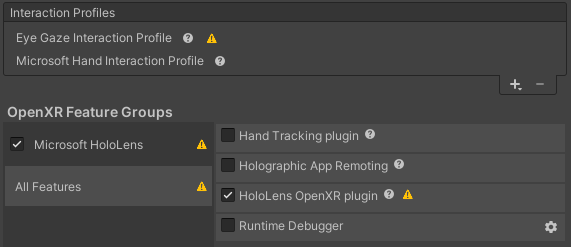
### Enable OpenXR features
OpenXR plug-ins and other packages can provide optional feature implementations that you can use with OpenXR itself. For example, the Unity OpenXR plug-in provides a **Runtime Debugger** and a **Mock Runtime** as OpenXR features. After you [enable the OpenXR plug-in](#enable-openxr), you can enable any available features.
Some features are organized as a *feature group*. You can enable a feature group to enable all the features in that group.
To enable an OpenXR feature:
1. Open the **Project Settings** window (menu: **Edit > Project Settings**).
2. Click **XR Plug-in Management** to expand the plug-in section (if necessary).
3. Select **OpenXR** in the list of XR plug-ins.
4. Select the tab for a platform build target to view the features for that target.

*OpenXR features and feature groups*
5. Select the features and feature groups to enable.
6. Repeat for any other platform build targets your project supports.
If a feature has its own configuration options, you can click its gear icon () to open the feature's settings window. Some features provide an icon following their name that links to documentation.
See [OpenXR Features](index.md#openxr-features) for more information about features and groups.
### Set the render mode
The **Render Mode** determines how OpenXR renders stereo graphics. Different plug-ins might support different modes, but the typical choices involve some form of the following:
|**Option** | **Description** |
| --------- | --------------- |
|**Multi-pass** | Each eye is rendered separately in independent *passes* from slightly different view points. Because the entire scene is rendered twice, multipass rendering is typically slower than other options. However, it is also the most similar to nonstereo rendering and does not require you to adapt your shader code. |
|**Single Pass Instanced** | Both eyes are rendered in one pass. Scene data is shared between the eyes using instanced draw calls, reducing the amount of data that must be transferred from the CPU to the GPU. Single-pass rendering is typically much faster than multi-pass, but requires compatible shaders. |
| **Single Pass Instanced / Multi-view** | Some GPU hardware supports instancing, while others support multi-view. The two render modes are otherwise very similar. If an OpenXR plug-in supports both types of hardware, you will see this option instead of the **Single Pass Instanced** option. |
To set the render mode:
1. Open the **Project Settings** window (menu: **Edit > Project Settings**).
2. Click **XR Plug-in Management** to expand the plug-in section (if necessary).
3. Select **OpenXR** in the list of XR plug-ins.
4. Select the tab for a platform build target to view the features for that target.
5. Choose the desired **Render Mode**.
For more information see:
* [SinglePassStereoMode](xref:UnityEngine.Rendering.SinglePassStereoMode)
* [Single Pass Instanced rendering](xref:SinglePassInstancing)
### Set the color submission mode
Some OpenXR runtimes support rendering to additional swapchain formats, such as 10- or 16-bit
high-dynamic range (HDR). Alternately, some performance may be gained on some devices by choosing
lower fidelity as a trade-off. The available formats depend on both the Unity version you are using
and the device and runtime that the Player is run on.
*Auto Color Submission Mode* currently selects the default platforms which is typically an 8bpc RGBA/BGRA format.
|**Option**|**Description**|
|---|---|
|**8 bits per channel (LDR, default)**|The default 8bpc RGBA/BGRA format. Will use sRGB if supported and either default or selected in player API options (e.g. in GLES).|
|**10 bits floating-point per color channel, 2 bit alpha (HDR)**|Packed 10bpc unsigned normalized floating-point color with 2 bits of alpha depth.|
|**16 bits floating-point per channel (HDR)**|16bpc signed half-width floating point color/alpha.|
|**5,6,5 bit packed (LDR, mobile)**|Compact packed format typically only used on low performance mobile devices and low gamut displays.|
|**11,11,10 bit packed floating-point (HDR)**|Packed color-only format using 11bpc unsigned float for red and green channels and 10bpc for blue.|
The best choice depends on your use case, platform, and target devices. Larger HDR formats will
generally encounter lower performance especially on lower-spec hardware, but generally provide
better rendering integrity in scenes with high dynamic range or luminance gradients (where banding
may be noticeable in LDR formats).
Reasonable rules of thumb when choosing a setting:
* For PC XR devices, consider your target devices and choose a performant HDR setting if you need
HDR. This often depends on the graphics API, GPU, and XR device together, so it may require extra
performance testing.
* For mobile XR devices, HDR swapchains are generally unsupported. In most cases it's best to stick
to **Auto Color Submission Mode** or **8 bits per channel (LDR, default)**.
To set the color submission mode:
1. Open the **Project Settings** window (menu: **Edit > Project Settings**).
2. Click **XR Plug-in Management** to expand the plug-in section (if necessary).
3. Select **OpenXR** in the list of XR plug-ins.
4. Select the tab for a platform build target to view the features for that target.
5. Uncheck **Auto Color Submission Mode**.
6. Choose the desired **Color Submission Mode**s and sort according to priority (the order the list
is in sets the priority; actual selection depends on graphics API and hardware support.)
**8 bits per channel (LDR, default)** can be reordered but cannot be removed; it is a safe
fallback.
### Set the depth submission mode
Many OpenXR runtimes can use depth information to perform more accurate and stable *reprojection* of content during rendering. The available **Depth Submission Modes** include:
|**Option**|**Description**|
|---|---|
|**None**|No depth submission support. No depth based stability or re-projection support that the platform might provide is enabled.|
|**Depth 16 bit**|A shared depth buffer using 16 bits per pixel is used.|
|**Depth 24 bit**|A shared depth buffer using 24 bits per pixel is used.|
The best choice can depend on the platform and specific target devices. Depth can significantly reduce judder and other XR rendering artifacts, especially with mixed reality (MR) content that combines rendered graphics with real-world video. The 16-bit option uses less bandwidth to transfer data between the CPU and GPU, which can improve rendering performance and battery life on mobile-type devices. However, the 24-bit option can minimize sorting issues and "z-fighting".
A reasonable rule of thumb to use when choosing a setting is:
* use 24-bit depth on PC XR devices
* use 16-bit depth for battery powered XR devices -- unless judder or sorting issues occur
* use **None** if your target devices don't use depth information or if you find that the benefits don't outweigh the extra rendering and battery life costs.
To set the depth submission mode:
1. Open the **Project Settings** window (menu: **Edit > Project Settings**).
2. Click **XR Plug-in Management** to expand the plug-in section (if necessary).
3. Select **OpenXR** in the list of XR plug-ins.
4. Select the tab for a platform build target to view the features for that target.
5. Choose the desired **Depth Submission Mode**.
Setting the mode to anything other than **None** enables the OpenXR [XR_KHR_composition_layer depth extension](https://www.khronos.org/registry/OpenXR/specs/1.0/html/xrspec.html#XR_KHR_composition_layer_depth). Unity ignores the **Depth Submission Mode** for OpenXR plug-ins that do not support this extension.
### Choose an OpenXR runtime to use in Play mode
By default, Unity uses the OpenXR runtime that is setup as the active runtime for your computer. You can specify a different OpenXR runtime with the **Play Mode OpenXR Runtime** setting. Unity uses the selected runtime when you run a Scene using the Editor Play mode. See [Runtime Discovery](https://www.khronos.org/registry/OpenXR/specs/1.0/loader.html#runtime-discovery) for more information about how the active OpenXR runtime is determined.
> [!NOTE]
> The **Play Mode OpenXR Runtime** setting is not saved between Editor sessions. It reverts to the **System Default** option on exit.
To set the OpenXR runtime to use in Play mode:
1. Open the **Project Settings** window (menu: **Edit > Project Settings**).
2. Click **XR Plug-in Management** to expand the plug-in section (if necessary).
3. Select **OpenXR** in the list of XR plug-ins.
4. Select the Mac, Windows, Linux settings (PC) tab.
5. Choose the desired **Play Mode OpenXR Runtime**.
The available options include the following choices:
|**Option**|**Description**|
|---|---|
|**System Default**| The active OpenXR runtime on your computer. Device makers who support OpenXR sometimes provide a utility to designate their OpenXR runtime as the active one.|
|**Windows Mixed Reality**| If available, sets the current OpenXR runtime to the Microsoft OpenXR runtime for Windows Mixed Reality.|
|**SteamVR**| If available, sets the current OpenXR runtime to the SteamVR OpenXR runtime.|
|**Oculus**| If available, sets the current OpenXR runtime to the Oculus OpenXR runtime.|
|**Other**| Specify a runtime by selecting its `json` config file on your hard drive. Choose this option to use an OpenXR runtime that Unity might not directly support or detect automatically.|
> [!TIP]
> When you hold your mouse over the drop-down control for the **Play Mode OpenXR Runtime** options, the tool-tip that pops up shows the path to selected OpenXR runtime.
### Set the interaction profile
When using an OpenXR plug-in, you must specify which interaction profile to use. You can choose a profile in the **OpenXR** section of the **XR Plug-in Management** settings.
To add an OpenXR interaction profile:
1. Open the **Project Settings** window (menu: **Edit > Project Settings**).
2. Click **XR Plug-in Management** to expand the plug-in section (if necessary).
3. Select **OpenXR** in the list of XR plug-ins.
4. In the **Interaction Profiles** section, click the **+** button to add a profile.
5. Select the profile to add from the list.
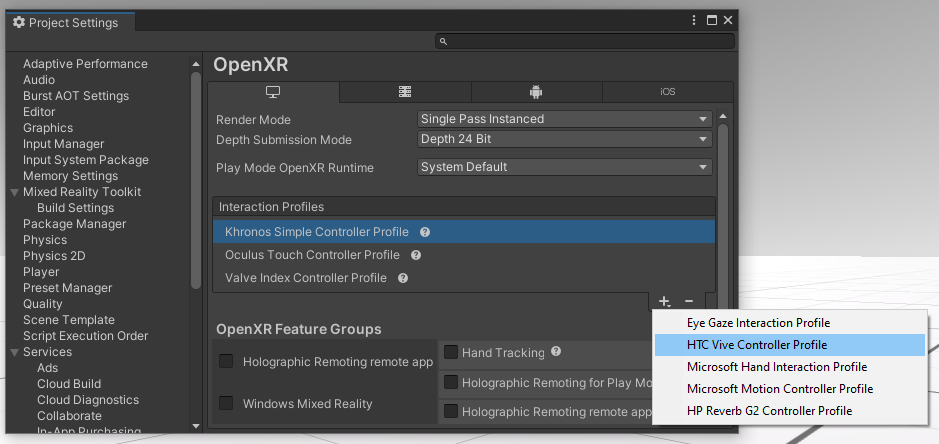
*Choose an interaction profile*
See [Input in OpenXR](xref:openxr-input) for more information.
### Set the rendering color space
When you use the OpenGL graphics API, you must set the Unity Editor to use the linear [color space](xref:LinearRendering-LinearOrGammaWorkflow).
To change the color space:
1. Open the **Project Settings** window (menu: **Edit > Project Settings**).
2. Select the **Player** settings category.
3. Scroll to the **Other Settings** section. (Click **Other Settings** to open the section, if necessary.)
4. Under the **Rendering** area, choose a **Color Space**.
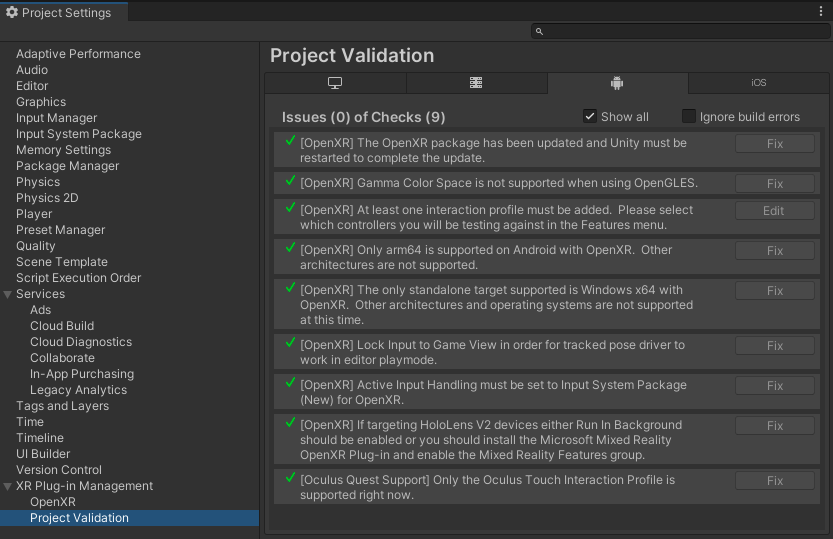
## Project validation
The OpenXR package defines a set of rules for the Project Validation system. These rules check for possible incompatibilities between OpenXR and the project configuration.
Some of the rules serve as warnings for possible configuration problems; you are not required to fix these. Other rules flag configuration errors that would result in your app failing to build or not working once built. You must fix these errors.
If you have the [XR Core Utilities](https://docs.unity3d.com/Packages/com.unity.xr.core-utils@latest) 2.1.0 or later installed, you can access the Project Validation status in the **Project Settings** window under **XR Plug-in Management** (menu: **Edit > Project Settings**). These results include the checks for all XR plug-ins that provide validation rules.
You can also open a separate **OpenXR Project Validation** window for OpenXR (menu: **Window > XR > OpenXR > Project Validation**). This window only shows the validation results related to the OpenXR plug-in and features.
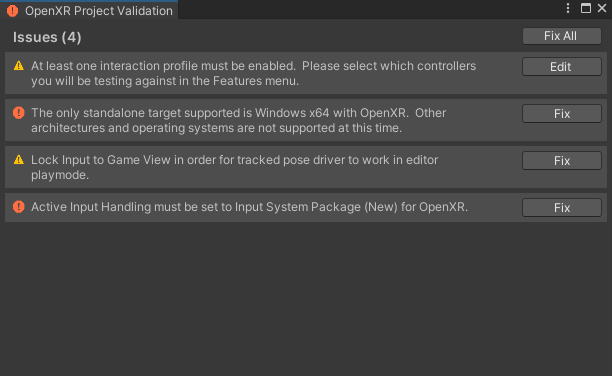
Rules that pass validation are not shown unless you enable **Show all**.
Some rules provide a **Fix** button that updates the configuration so that the rule passes validation. Other rules provide an **Edit** button that takes you to the relevant setting so that you can make the necessary adjustments yourself.
You can enable **Ignore build errors** to bypass the pre-build validation check. However, any misconfigured features in your app might not work at runtime.
### Validation issues reported in XR Plug-in Management
Clicking on either the validation warning or the error icon brings up the Validation window.
### Validation issues reported in features pane
Clicking on either the validation warning or the error icon brings up the Validation window.
### Validation issues reported in build
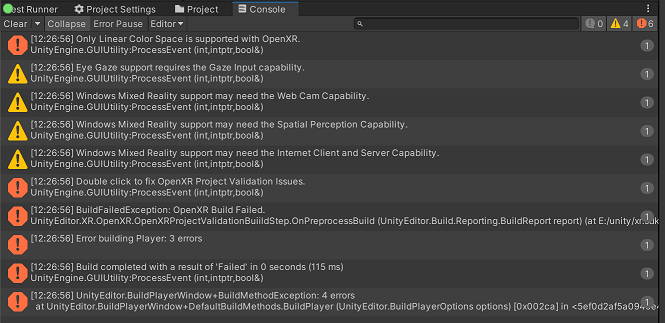
Double-clicking on build warnings or errors from validation brings up the Validation window.